Followers

Friday 30 June 2017

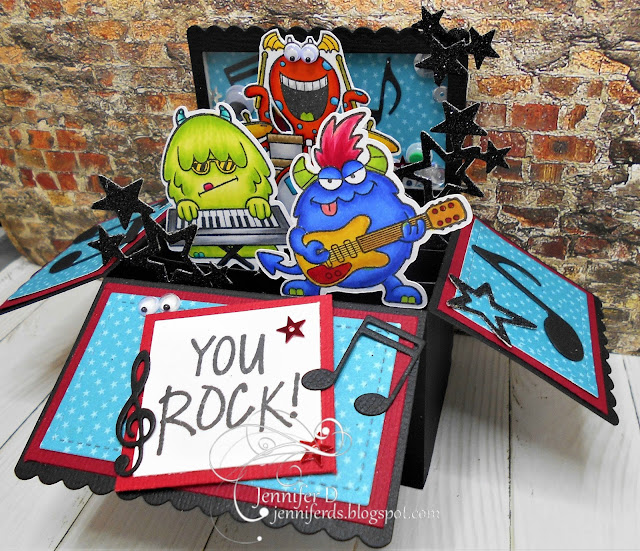
Rock Star Deep Ocean Lots of Layers


Hi I am here with my DT Card for
and the theme is
and our Wonderful sponsor is
 with a 

This card was soooo much fun to create. I used the
YNS Silly Monster Rockstars Stamp Set. The Music Notes are
from Cuttlebug and MFT. The Stars are La-La Land Crafts Star Border.
I used the LF Scalloped Box Pop Up and also created a shaker in the
back using this Tutorial and filling it with eyes, stars and sequins.


I popped some googly eyes on the drummer

and a close up.

 Happy 13th Birthday Kobe!

Wednesday 28 June 2017

Lawn Fawn Magic


Hi I am here with my card for The Rubber Buggy and I am
using the new LF Magic Color Slider kit and it is Awesome
and so easy to use ! I can see this being used an Awful lot here!

So to start with I made a card base with white Card Stock
layered with blue I then used LF Peacock Card Stock and
Coloured it with a mix of Oxide Inks Faded Jeans and
 Broken China splattered it with water and blotted to give a 
water look. I dont have the new LF Ocean Wave Borders yet
so I improvised and used LF Puffy Cloud Borders which
I think worked well. The Stamp sets I have used are

I had some googley eyes in my stash that just added.
I coloured them all up in a mix of copic colours. 
Don't you love how it reveals the colour picture.

Magic!


All these products and more are available at the
The Rubber Buggy Shop and don't forget to visit us on Facebook 
 look for the Videos down the side too, Instragram and the 
Rubber Buggy Design Team Blog where there's a post nearly
 everyday from one of the team.

Happy Crafting
Jennifer

Monday 26 June 2017

Flowers Using La-La Land Crafts Dies


Hi Everyone hope you have all had a Wonderful Weekend.
I am here with my post for 
and the theme is

Stamp  
Fabulous Molli
Dies 
 Stitched Pennants
 Flower Border
Pierced Scalloped Circles (Set of 4)
Double Stitched Circles (Set of 4)
Stitched Nested Circles (Set of 7)
Stitched Nested Hearts (Set of 4)

Copics
Face - E0000, E000, E00, E01, E11, R20
Hair - E40, E42, E43, E44
Dress, Shoes - C01, C02, C03
Dress Trims, Roses on shoes - R32, R35, R37, R39


 Also don't forget to join in all the La-La Land Crafts fun by adding

your creations to our Facebook page . Also for more Inspiration we are on Twitter , Pinterest and Instagram too.

Happy Crafting Everyone

Jennifer

Thursday 22 June 2017

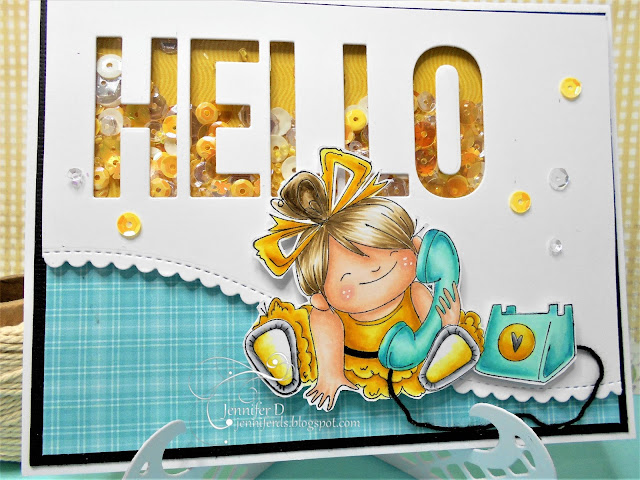
Stamping Bella Wonderful Wednesday - Hello Chatty

 Hi I am here with my Stamping Bella Wonderful Wednesday post. I had lots of fun 
creating this one the hardest part was choosing the colours as I wanted
to create her in ever colour so I think I might just have to create a few more๐Ÿ˜‰

 Today I have used the largest  Rubber Stamp of Chatty Squidgy she is also
 available as a "CUT IT OUT" die or as a BUNDLE (Rubber Stamp
and "Cut It Out" Die) where you save 15% when purchased together.


So first of all I coloured Chatty up using Copics.
Face - E0000, E000, E00, E01, E11, R20
Hair - E40, E42, E43, E44
Belt, Shoes - C0, C01, C05, N07, N09
Phone - BG10, BG11, BG13, BG45
Dress, Ribbon, Soles of Shoes - Y11, Y15, Y18, YR23

So to create this card I layered black cardstock and a designer paper
on a white card base. Then on a layer the same size as the designer 
paper in white I cut out the  MFT Big Hello  and cut a scallop

I then covered the back with acetate and 3M tape around the whole section 
and the hello to create a shaker card section.

I then Popped sequins in it and covered the back with yellow
designer paper.

I put it all together and scattered some sequins around. I couldn't fussy cut
around the phone cord so I replaced it with some really lovely  black thread.
It would have been so much easier if I had bought a "CUT IT OUT" die
at the start  ๐Ÿ˜‹. 
Ssssh don't tell but the other problem I had I coloured her shoes to dark
so I restamped,  coloured, fussy cut and glued them on and they worked
 beautifully because the rest of her I was really happy with.

I hope you enjoyed this card and Happy Crafting.

Jennifer
Wednesday 21 June 2017

The Rubber Buggy - Rabbit, Flower, Butterfly


Hi I am here  with Tuesday's post for
The Rubber Buggy
I am still waiting
on the Postie with all my new goodies to create with I 
will keep my fingers crossed and hopefully they will be
here before next week to share with you all.
So this week I used this really Cute Stamp
created this background by wiping Distress Ink Pads on a
Tim Holtz Mat.I used Picked Raspberry, Dusty Concord and
Wilted Violet inks on a mat and spraying 2 squirts of water on
 each colour. I then smoosh my papers in them  drying inbetween
each layer and building up until its the right depth. I did it quiet
dark. I then sprayed it using Tim Holtz Perfect Pearls


As you can see by the Memory Box Distressed Addington Die
I only needed one corner with colour. I then diecut it from 
White Card Stock and used 3D Foam Tape around the edges and a
 couple of strips down the center for support and taped it too the 
coloured piece. You could use any of the Memory Box Dies with
an open pattern to do this with.

I then stamped the Butterfly only making sure I didn't get ink on
 the rabbit. I coloured it roughly. I then stamped another two
butterflies and fussy cut the butterfly wings one altogether and 
the other with only the top wing. I coloured them and then  covered
them in Wink of Stella Clear. I then layered each
one using 3D foam squares.

I then sprinkled a few clear sequin around. I then stamped
and fussycut the Rabbit and used 3D Tape to pop him on.

I also layered it on a white card base with an aqua layer.
All these products and more are available at the
The Rubber Buggy Shop and don't forget to visit us on Facebook 
 look for the Videos down the side too, Instragram and the 
Rubber Buggy Design Team Blog where there's a post nearly
 everyday from one of the team.

Happy Crafting
Jennifer

Monday 19 June 2017

La-La Land Crafts - Colour Inspiration


Hi it's Monday and hope you all had some wonderful sunshine on your weekend.
Well I am here with the theme for 
and it is a 


 I have used  Cool Beans Luka  and inlayed the Happy for
a great effect.
                    
Stamp 
 Cool Beans Luka
Dies
Coffee Cup
 Donut
Happy

Copics
Face - E0000, E000, E00, E01, E11, R20
Hair - E30, E33, E50
Beanie, Shirt, Shoes - YR07, YR09, YR23, E33
Cup - C01, C02, N5
Pants, Jacket, Soles of Shoes - E70, E71, E74, E79

 Also don't forget to join in all the La-La Land Crafts fun by adding
your creations to our Facebook page . Also for more Inspiration we are on Twitter , Pinterest and Instagram too.

Happy Crafting Everyone

Jennifer

Thursday 15 June 2017

La-La Land Crafts - Diorama Card Tutorial

Hi I am here with La-La Land Crafts for Tutorial Thursday. I am going to
show you how to create a Diorama Card.


First I cut 3 pieces of card stock the same 9 inches x 4 3/4 inches.
I scored at 1 3/4 Inches and 7 1/4 inches.
I then cut out those 2 corners cutting down from the top 1/2 an inch.

Then using the Large Fancy Bracket Die  I cut the top as in the
picture below to all three pieces.

I used the photo die from Photo Elements to cut out the centre
for our card it was about half an inch from the bottom and centered.
Only do this to two of your pieces.

So two of them look like this.

Then one of the two pieces I cut 1/2 an inch off each side.

So to decorate it I did one layer at a time. This is the back the piece
without the hole. I used the Island Die and Double Stitched Hills Border.


This is the one we cut the 1/2 inch of the sides which is our middle
layer. I popped a piece of acetate on the back of the hole as the 
Koi Circle wasn't strong enough another thing I could of used is
the Chipboard diecut with the Koi Circle and not put the acetate there.
I used Spring Blossoms Small layering a yellow and white.
I coloured my pearls with a yellow copics for the center.
The Waves Die was perfect for this card. I used these adorable
Dolphins from Oceans Of Joy.

This is the front I used the Floral Pocket dies on the sides and
on the front Summer Vacation Marci and another of the dolphins.
The flowers are a mix of Spring Blossoms Small and 
Spring Blossoms. For the top of the card the Aqua Strip is cut using
the Fancy Brackets.
I also decided I needed another wave so I cut a 9 inch strip 1/2 an
 inch wide and scored at 1 3/4 and 7 1/4 I then cut of each end 
1/2 an inch.

Ok to put it all together I taped the the edges of the 1/2 inch strip 
and center piece and stuck it to the inside flaps of the back 
making sure the bottoms are all straight.

The front then goes on the outside of the back side flaps.

They do fold flat for an envelope to send. 

 Here is another one I created.

A side look.


 Also don't forget to join in all the La-La Land Crafts fun by adding
your creations to our Facebook page . Also for more Inspiration we are on Twitter , Pinterest and Instagram too.

Happy Crafting Everyone

Jennifer

Stamping Bella - Daisy Border Shaker

Daisy
Hi I am here for Stamping Bella 's Wonderful Wedensday and today
I have used a fun Border Shaker  on my Card. Think I might be 
finding myself doing some more of these. 

 I have used this Very Very adorable Rubber Stamp DAISY SQUIDGY
 and she is also available as a "CUT IT OUT" and BUNDLE where you
 save 15% when purchased together. 


 I have used the biggest DAISY
Stamp and stamped her on the second biggest MFT inside/out rectangle 
 and coloured her up with copics

Copics
Face - E0000, E000, E00, E01, E11, R20
Hair - E40, E41, E43, E44
Dress, Shoes - BG11, BG13, BG45, BG49
Flower Stem - YG11, G21, G63
Flower - C0, C01, C02
Flower Center - Y11, Y15, Y18, YR23, E35

I then cut out the largest MFT Rectangle Scallop Frame. Cut a piece of 
acetate to cover it and stuck them together. I taped Daisy to the outside of
 the acetate in the centre. 

Then on the back as in the pic below I placed
my 3M tape around the frame and around Daisy.

I then filled the outside with sequins.

I then put a piece of yellow designer paper to hold them in the same size as the acetate.

I then layered that on aqua design paper and a white card base.
I have not put a sentiment on her yet  as I thought she can be used for so
many, Thankyou, Birthday, Hi etc.

I hope you enjoyed this really cute card.
See you next week
Happy Crafting

Jennifer

Wednesday 14 June 2017

The Rubber Buggy Magical Christmas Faries

 Hi I am here for The Rubber Buggy  with a Christmas in July
Card I am trying to be a little bit organized this year.
Just a reminder too take a look at all the amazing
What's New section of goodies in the shop and on Preorder.
I have a nice bundle comming so cann't wait to get it and create 
for you.


So I have done a Border Shaker Card using
LF Fancy Scalloped Rectangles the largest and largest
LF Stitched 4 Bar Rectangles also. I cut the frame.
I added acetate to the back and diecut 
LF Small 4 Bar Stitched Rectangle and  added 3 clouds
one of each of the LF Puffy Cloud. 1 in card stock and the other 
2 in velum layered to look good. I also cut them out using the
center rectangle die and the glued them on. Papers used are
LF Perfectly Plaid 6x6 the sequins are a mix from all the
newly stocked range of Sequins. I have created a shaker card
using the 3D Tape around the edge of the image piece
that I taped to the center of the acetate and the frame. The stamps I 
used were all from Lawn Fawn Frosty Fairy Friends.


All these products and more are avaliable at the
The Rubber Buggy Shop and don't forget to visit us on Facebook 
 look for the Videos down the side too, Instragram and the 
Rubber Buggy Design Team Blog where there's a post nearly
 everyday from one of the team.

Happy Crafting
Jennifer
Related Posts Plugin for WordPress, Blogger...